Thursday, January 31, 2013

Heartfelt Scrapping Page

Part of the brief for Heartfelt Brisbane was to have a range of projects that displayed the technique or class taught. . . so I extended myself and did a scrapping page! Yeah I know that I rarely share my scrapping pages ~ it's not because I don't scrap it is simply a case of the pages and projects that I do are very personal to me or the person who is the subject of the project. . .

So here is a scrapping page of my beautiful mother Charmie-love.
The base cardstock is Crumb Cake on Riding Hood Red.  I have then used a Fan Fair DSP page and stenciled the lattice deign and mounted the lattice which was cut out using the Lattice Bigz die.  I fussy cut the Eiffel Tower from a sheet of the Fan Fair DSP.

Across the bottom I box-pleated another piece of the Fan Fair DSP then stitched it together with embroidery thread on a colour equivalent to Riding Hood Red. Behind the pleated paper is a number of Riding Hood Red Paper Doilies which were cut with the Big Shot Sizzlet and then behind that again I have used Crumb Cake Scalloped Tulle Ribbon highlighted with Champagne Glass Glitter.
The roses were handmade using the Fancy Flower Punch, Riding Hood Red cardstock and Fan Fair DSP which I then daubed with Riding Hood Red ink and sprayed with Crafting Perfumer (Champagne Shimmer Paint diluted with isocol rubbing alcohol).  The leaves were cut using the Little Leaves Sizzlet and the Blossom Builder Punch using the Core'dinations cardstock in Gumball Green. I ran the cardstock through an embossing folder to give them texture and dimension. I interspersed a few Paper Daisies and added a Rhinestone Jewel to the centre of each.
I stamped the title out in Riding Hood Red on Very Vanilla cardstock using the Lovely Letters Alphabet and then fussy cut each letter and glossed them up with Crystal Effects. Every girl has to live a fairy tale. . .

Enjoy
Shanni xx

Tuesday, January 29, 2013

I Adore Paris at Heartfelt

I love tins in all shapes and sizes. . .I collect them at markets, garage sales and shops whenever they are on sale ~ I tend to re-decorate them to give them a new lease on life and hopefully they are appealing and practical too.

This is another of the Off the Page projects that I shared at Heartfelt in Brisbane in November.
I have covered a long cylindrical wafer biscuit tin with Fan Fair Designer Series Paper and cardstock.  I roughly stamped the paper with the splotches stamp from the French Foliage stamp set (in Crumb Cake) and daubed the edges to distress the paper.  I just adore the Parisian themed pages.  The Eiffel Tower is such a romantic structure that it appeals in every vintage project.
The roses are made with Very Vanilla cardstock using the Fancy Flower punch.  It was only fitting that I use one of the leaves from French Foliage ~ I stamped these in Island Indigo and fussy cut them and distressed them to fit the project.  They are all attached with Dimensionals.  I also punched leaves with the Bird Builder punch in the Champagne Glimmer cardstock.
I also added some Paper Daisies which I had daubed with Island Indigo ink to beak up the bouquet.  Pearl Jewels were the perfect embellishment for the centres of these.  I love the random More Mustard lace image that is on the DSP as it really blends in with the whole project theme.
The top of the tin was decorated in a consistent fashion with More Mustard cardstock as the base, more roses, leaves and flowers.

An easy and enjoyable project.
Shanni xx

Saturday, January 26, 2013

Off the Page Projects for Heartfelt

When Sophie Zadeh from Stampin' Up! asked me to demo at Heartfelt she said that I needed to show something that was a bit unusual that might appeal to paper crafters. . . I was a little bit worried because papercrafting is all about individual tastes and just because I like something is no guarantee that anyone else will.  So I felt quite tentative in suggesting that I teach rose making. . . Fortunately my demos seemed well received

Thanks to all the attendees for coming to watch my demo and for your warm reaction and response.

Here are some of the Off the Page projects that I displayed at Heartfelt Brisbane in November.
This is a small rectangular tin that I covered with First Edition Specialty DSP then Not Quite Navy cardstock which I had stamped with the flower stamp from Elements of Style set in Whisper White Craft ink.  I distressed the cardstock both before and after to give the tin an aged look.

I decorated the tin with small rose buds that I made using the Rose Making technique that I demo'ed at Heartfelt.  The roses are made from Whisper White cardstock daubed with Not Quite Navy ink. I wanted to add a contrasting colour so I made some small filler flowers with Whisper White cardstock punched with 11/4 circle punch and cut and curled in a spiral fashion.

The leaves are punched with the Bird Builder punch from Fan Fair DSP and Silver Glimmer paper.  The pearls add just the right contrast and continue the floral theme.
I wanted to add something a bit unusual to this box and a friend of mine Susan Smit from Holland (sussipoppins) incorporates angel wings onto lots of her projects.  So I cut these acetate wings using the Elegant Birds Bigz Die and then dusted the tips with Dazzling Diamonds (and Tombow glue).
The tin is the perfect size for reinkers and other embellishments.

Next project is a photoframe that I "dressed up".  It includes the Stampin' Up! Statement of the Heart along with a stamped image from Elements of Style (that I coloured in with Stampin' Write Markers).
Roses made with Riding Hood Red cardstock and Fan Fair DSP.  The leaves are punched using Garden Green cardstock and the Little Leaves Sizzlet. I also punched a few leaves with the Bird Builder punch and Champagne Glimmer Paper. I can't resist a bit of glitter and bling in my projects.

The latice is punched with the Lattice Bigz die from Brushed Gold cardstock and the Crumb Cake Scalloped Tulle Ribbon has been topped with Tombow glue and Champagne Glass Glitter.  I daubed the roses with Riding Hood Red ink to tie in the over all colour scheme.

Hope this inspires you to transfer your paper crafting skills from flat cards and scrapping pages to 3D items.

Ciao for now
Shanni xx

Wednesday, January 23, 2013

Handmade Rose Cards for Heartfelt

I know that you are probably over these cards by now, if so please feel free to skip back or ahead. . .

Heartfelt was such an amazing event.  The staff at Stampin' Up! go that extra mile and do it all with professionalism and enthusiasm.  If you ever have opportunity to attend one of these events make sure you do so.
This is a very traditional card.  It is good for weddings, anniversaries and specific age birthdays (21st, 40th, 60th etc).  It is surprisingly easy to make and always makes an impact.

The cardbase is Very Vanilla and Cherry Cobbler.  The flourish you see behind the leaves is from Everything Eleanor stamped in Always Artichoke.  I love how the regal colours all compliment each other and I tend to used colour family ink colours together for that reason.
The leaves are cut out with the Little Leaves Sizzlet in Always Artichoke cardstock.  The roses are all made with the Fancy Flower punch and Cherry Cobbler cardstock in the same manner set out in my Hand Made Rose tutorial in an earlier post.  I sprayed the creation with Crafters Perfume - isocol and Champagne Shimmer Paint.  You will also note a piece of ribbon to break up the bouquet - Very Vanilla and Cherry Cobbler Seam Binding.
This card is made in almost the identical way as the card above except it has a few more elements to add to the feeling of vintage and weight (which I think makes a card all the more appealing). Cardstock is Riding Hood Red, Crumb Cake and Very Vanilla.  First Edition Specialty DSP daubed with Riding Hood Red ink.  Flowers made with Fancy Flower punch in Riding Hood Red cardstock and leaves in Old Olive using the Little Leaves Sizzlet.  You might also notice the latice in the background - cut from Brushed Gold cardstock with the Bigz Lattice die.
The butterflies are from the Papaya Collection stamp set, stamped in Basic Black Craft ink and coloured with Watercolour Crayons and Aqua pen, then daubed with Frost White Shimmer Paint.  I stretched the butterflies using a flower balling tool so that they had dimension.  I have also used Rhinestone Jewels to add whimsy to the card.

I hope you get some more ideas from this post. Drop me a line if you need to know how anything is done.

Cheers
Shanni xx

Saturday, January 19, 2013

Heartfelt Creations with Handmade Roses

At long last here are some of the cards that I made for Heartfelt in Brisbane in November.  A number of people have asked me to share these ~ I hope that you like them.

I was fortunate enough to be asked to share how I make my cardstock and paper roses that I use as embellishments on my paper crafting projects at Heartfelt.  I got to share the technique with hundreds of talented paper crafters which was a great experience (if somewhat daunting). Anyway thanks to everyone that attended and for all the positive feed back.
This is made with a combination of materials - Crumb Cake and Cherry Cobbler cardstock, a piece of the corrugated packaging cardstock that my Stmpin' Up! orders come in, First Edition Specialty DSP and Crumb Cake Scalloped Tulle Ribbon. 
I have used the Fancy Flower punch as the basis for the roses and a 1 3/8 circle punch cut into spiral flowers for the filler flowers. 
The Butterfly was stamped with Elements of Style stamp set and cut out on the Big Shot with Beautiful Butterflies Bigz die.


Here is a simpler card incorporating three roses.
I have used Cherry Cobbler and Very Vanilla cardstock, incorporated Fan fair DSP.  I have also used En Francais and Summer Silhouette stamped images (I fussy cut the stamped leaf image).  For texture and interest I used the Crumb Cake Scalloped Tulle Ribbon, Linen Thread and Island Indigo Bakers Twine.

I love tag cards and usually find it hard to avoid making at least one of these whenever I am asked to share some of my card making skills.
I adore the images from Papaya Collage and have used the filigree frame for this card.  The leaves stamped in Always Artichoke from the French Foliage set (which I fussy cut).  The background is En Francais.
I punched out a Paper Doily using the Big Shot Sizzlet and vellum cardstock which I then aged. The card base is Very Vanilla daubed with Crumb Cake ink and the flower is made from Very Vanilla cardstock daubed with Rose Red ink and sprayed with crafting perfume - isocol alcohol and Frost White Shimmer Paint.  The ribbon is Very Vanilla Seam Binding and Linen Thread with a Vintage Faceted button for bling!

Until next time
Shanni xx

Thursday, January 10, 2013

Rose Making Tutorial

I have had computer issues this past seven weeks and am finally back on line this week. . . apologies for those who have been waiting for this tutorial. 

Here it is ~ my rose making technique that I did at Stampin' Up! Heartfelt event in Brisbane in November:

I use the Fancy Flower Punch, a bone, SNAIL, Tombow glue, scissors (very sharp ones like Stampin' Up! snips are the best) and tweezers.
I punch four flower shapes using Stampin' Up! cardstock or Designer Series Papers - these are the best materials for the job.  I find that other papers and cardstock, split, become brittle or simply tear.
Next I break down the fibres in the punch outs using a bone. I use the bone underneath each of the punch outs and pull from the centre of the flower out towards the edges.  I also use the rounded end of the bone as opposed to the pointed end to avoid tearing the cardstock.  It is important to get the cardstock to a soft almost curled stage.

Next I curl the edges of each petal of the punched out cardstock so that each piece represents a star shape.  I curl in the same direction as I have broken down with the bone.
I then stretch one of the flowers over the end of a Tombow bottle to create a "well" in the flower. This is another purpose for the glue bottle - the rounded end is the perfect mold for this purpose. I do this with the curled petals facing upwards and the smoother side of the cardstock facing down towards to the lid of the glue bottle.  I press quite hard (but not hard enough to tear the cardstock). I press the card around the shape.
I fill the "well" with a healthy dollop of Tombow glue.  Do not be stingy with the amount you use because this serves as the adhesive for the entire throat of the flower. I do this at this step in the rose building so that the glue can start to dry (which means that it holds the flower more firmly).
There are three punched out flowers left.

Using another flower, cut between two of the petals all the way to the centre of the flower.  I have used another coloured cardstock to indicate where you cut the punched out shape ~ you do not need to draw a line to cut.  Simply snip it with your Paper Snips.  Don't fret if you happen to cut too far.
Next using your SNAIL, put glue on one of the petals to one side of the cut line.
Draw the unglued petal around on top of the glued petal to create a four petaled flower.  It will create a cone shape out of the flower.  Make sure that the outer edged (the curved edge) of the flower is perfectly aligned.
Next fold the flower perfectly in half and then in quarters (or halves again).  We are going to cut the bottom out of the flower so that when we mount it in the flower base it sits lower in the base. I have drawn a line where you need to cut using a different coloured cardstock. Make the line a little bit curved to follow the line of the outer petals. I usually cut at least 1/2cm off.
This is what it looks like once you have cut the tip of the cone off.
You should be able to fit your little finger in the hole perfectly. If you can't refold the flower and trim it a bit more.
Nestle this piece into the original base flower and move it around until the glue dollop has squeezed up through the hole.
You have two punched out flower shapes left.

These two flowers have the same shape cut out of them. Cutting in between two petals on each punched shape cut out a circle the size of an Aussie 20 cent coin (which is a bit larger than a quarter).  The circle is about an inch in diameter. I have drawn on the pink cardstock to show the shape of where to cut.
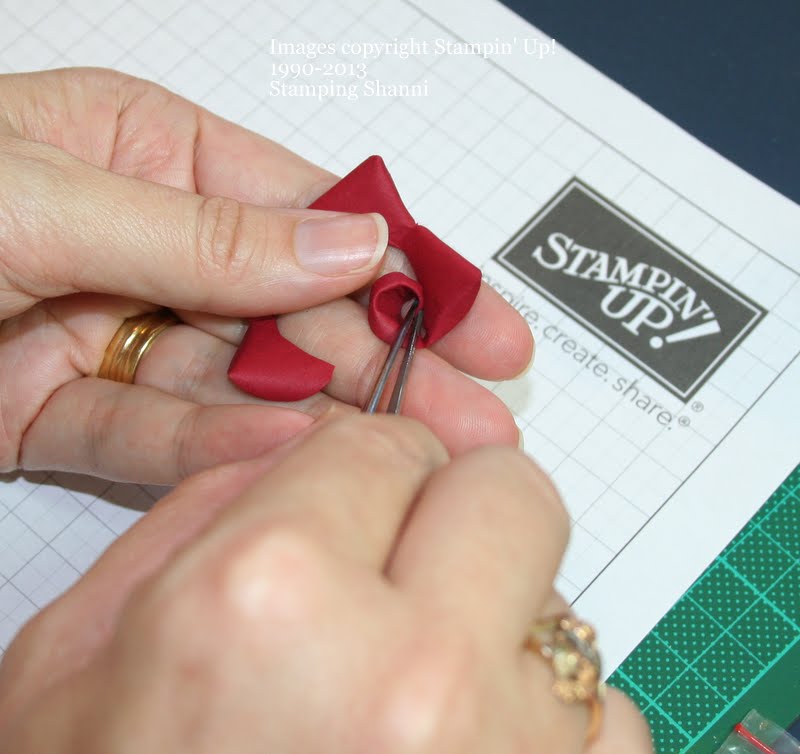
Next I roll one of the shapes using some tweezers and my hand as a base and guide. I place the flower on my palm folded petals facing down ward. I grasp the upper petal with the tweezers on the upper cut piece and then curl the shape tweezers in an anti-clockwise direction away from me.  I use my fingers, thumb
and tweezers to guide the rolling.  
 
It feels a little bit awkward to begin with but the more roses you make the easier it is.  I don't let go of the tweezers and usually finish with my tweezer hand (the right on in the picture) upside down. You are giving the cardstock a memory ~ when you gently remove the tweezers the card will stay in the spiral shape. Be careful not to twist it too tightly. If you do twist too tightly, unravel the spiral a little.

Next using a little bit of SNAIL (about 1/2cm) on the last petal I stick the final petal to the heart of the rose so that it stays in the spiral shape.
This is the heart of the rose and you are going to build around the outside of it.  You can use this by itself for projects where you want smaller roses.  If you would like them even smaller than this you can actually cut off one or more petals.  Experiment and enjoy the outcomes.
You have one last punched out flower left (with the circle cut out of the centre). You are going to cut this one between the second and third petals.
Use SNAIL on the inside (the circular side) of the petal where you have cut out the circle.  I always use about 1/2cm on the entire edge. Gently mold it around the heart of the rose. I always start where I finished sticking the final petal of the heart.  I do this because it reinforces the stuck down petal and it is a good place to start the new petal (off centre).
Next run the SNAIL around the inner edge of the three petaled piece - about 1/2cm wide along the entire edge. Then gently mold that shape around the heart of the rose.  Once again start where you finished to reinforce the structure and to ensure that all of the petals are off centre in the spiral shape.  Don't be afraid to bend and fold or crease the petals a little to make the flower look as natural as you can get it to be. Press the glued areas firmly to make sure that the whole flower is securely stuck.
You could use this sized flower on projects.  The bottom of the flower sticks perfectly on a Stampin' Dimensional and will secure nicely to any project ~ and if you have used the right amount of SNAIL it will never unravel!  

Finally nestle the heart into the rose base that you have prepared with the glued centre.  Rotate the heart until it fits into the space perfectly.  Leave the rose to dry and then come back and fiddle with the petals to get them to sit exactly as you want.
The beauty of the rose base is that it is a solid surface and will adhere to any project with Stampin' Dimensionals or Sticky Strip!

The secret to making these flowers look good is to practice.  So don't give up after your first.  Make at least three and by then you will have perfected the art of rose making.

I learned to make these from another talented Stampin' Up! demonstrator the beautiful Carolyn Rakowski.  Visit her blog (on the side bar) for more flower creations.

Thanks and enjoy!
Shanni xx