Sunday, December 17, 2017

Thinking Outside of the Box - Shopping Bags

Hello again! With Christmas just around the corner its all about the gifts, the gift wrapping and the packaging so this month the Thinking Outside the Box Design Team wanted to help you with Gift Bags, Shopping Bags and Totes for your Christmas gifts. . .
You might have just popped in from Barb's blog - isn't her project incredible?! Or you might have started with my blog - thank you!

This is my project:
I have approached this in a really basic and easy to make fashion, simply because if you are like me you might be light on time this Christmas and still want to do things to make your packages pretty.

I have used the following materials:

Year of Cheer Specialty Designer Series Paper
Copper Foil Card
Whisper White Card Stock
Soft Suede Ink Pad
Silver Mini Tinsel Trim
Year of Cheer Silver Embellishment
Mini Tassel Assortment (Gold)
Gold Metallic Thread
Silver Faceted Gems
4 brads

These are the tools that I needed:

Paper Trimmer
Simply Scored
Season to Sparkle Stamp Set
Stitched Edge Framelits
1/16" Hand Held Circle Punch
Layering Ovals Framelit Dies
Corner Rounder Punch

I trimmed the selected sheet from the Year of Cheer Specialty DSP pack to be 12"x 9" and cut 1 strip of Copper Foil card at 1"x 12", then cut the foil in halves at 6" (so you have two pieces 1'x 6") these are the features at the top edge of the bag.

This is how the piece is to be scored and trimmed:
Portrait ends scored at 1". Landscape edges scored at 11/2". Placing the paper landscape in the Simply Scored, score at 53/8" and again at 65/8".
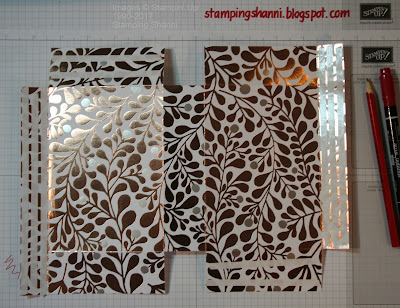
This is what the DSP looks like once you have done all your scoring. Know that you can adjust the width of the box to suit what you want to insert into the bag by changing the base measurements (the scores that are in the middle of the case card).
This photo is looking at the reverse side of the DSP with the trimmed edges folded in and the Copper Foil card adhered to the edges of the card and the extra corner's removed.
This is the right side of the DSP showing where I have added Tear and Tape Adhesive. The areas at the left and right ends of the photo are where the Copper Foil is stuck on the reverse.
These are the strips that ultimately become the handles of the bag. The copper Foil is 12"x 7/8" and the DSP is 116/8"x 5/8". I rounded the corners on all 4 pieces and adhered them together.
You construct the bag part of the project first and then adhere and decorate the handles.
I adhered the handles direct to the bag with adhesive, then pierced the handles and the bag with the hand held punch and used a brad to secure the handles even further. I added the Silver Faceted Gems over the top of the brads to marry in with the project.
 Here is a rear view. I actually like how the faceted gems and the DSP complement each other.
This is a view from above so that you can see how neat the bag is inside with no edges to catch on the gift that you might like to place in it. It's the perfect size for a pack of cards, some boxes of embellishments or a box of chocolates. . .
I wanted to add a sentiment so stamped the words from the Season to Sparkle stamp set in Soft Suede ink on Whisper White card and then cut the oval out using the Layering Ovals Framelits. I then mounted the sentiment on a further oval cut from the Copper Foil card using the Stitched Edge Framelits.
I placed the sentiment in the same way that a label would be placed on a real bag. I also added a tassel for a bit more bling. For this I used the Silver Mini Tinsel, a gold tassel from the Mini Tassel Assortment in the Annual Catalogue. I tied them together with some Gold Metallic Thread and threaded on a silver embellishment from the Year of Cheer Embellishments.

I hope you like the finished project and realise how simple it is to make. I would encourage you to try to make one for any gifts you are wanting to give over the Christmas and Holiday period. . .
Don't leave us just yet, you are going to be blown away by Tanja's totally awesome project - this woman is incredible!
Until next month, add some glitter to it ~ it will make you happier!
Shanni xx
Blog Hop Order December
1. Shannean Moncrieff (Australia) that's me!
2. Tanja Kolar (Germany)
3. Yoshiko Endo (Japan)
4. Zoe Tant (United Kingdom)
5. Annette Elias (Neterlands)
6. Sharlene Meyer (New Zealand)
7. Aude Barbara (France)
8. Barb Stewart (Canada)

Thursday, December 14, 2017

Fancy Folds - Corner Fold

Welcome back to another month of blogging with the Fancy Folds DT!  This month we are sharing our take on Corner Fold Cards. Hopefully you have just visited with Satomi and loved her project!

This is my card - the corner fold has been fun:
Guess what? It's a square card!! Base card is Real Red, mounted on the inside with a piece of the gingham DSP from the Quilted Christmas 6"x 6"Designer Series Paper Pack and then with a smaller square of Whisper White.

The front cover is a square of Dazzling Diamonds Glimmer Paper, mounted with a square of Pool Party card stock then finally a square of Whisper White card.
To pop the front of the card I used the Card Front Builder Thinlit Dies to build the boarder around the edge of the Pool Party card stock. Because the card is square and a little wider than the thinlit I adjusted the width by cutting one corner first but not allowing the entire piece of card to go through the Big Shot, then moved the thinlit and came in from the other side. I ended up with two stars about half an inch apart but thought that the card needed a central feature at the top of the front. I also used the Dark Pool Party Blend pen to freehand draw the lines on the bottom half of the card.

The Happy Christmas sentiment comes from the Seasonal Bells set in the annual cattie. I stamped it in Real Red ink on a scrap of Whisper White and fussy cut it out. You will also notice the pool party on the edges of the banner. I coloured this using the Dark and Light Pool Party Blend pens.
The ornaments are two different stamps from Carols of Christmas stamped in Real Red and Pool Party ink. I was trying to tie into the theme of decorating the house as the main stamped image of the woman from Christmas in the Making.
The additional sentiment is from Christmas in the Making and stamped in Tuxedo Black Memento Ink. The planned recipient for this card loves Christmas and I thought it the perfect time to help her celebrate.
I stamped the woman from Christmas in the Making in Tuxedo Black Memento Ink on Shimmery White card stock. I coloured the image using the following Stampin' Blends:

Hair - Light Daffodil Delight, Light and Dark Crumb Cake
Face - Ivory, Light Pink Pirouette and Light Cherry Cobbler (I also used Ivory for her arms and legs - I tended to blend the colours with the Colour Lifter)
Dress - Light and Dark Cherry Cobbler for collar, bow and shoes, Light and Dark Pink Pirouette for the dress and Light and Dark Pool Party for the dress feature. The holly is done in Dark Cherry Cobbler and Dark Old Olive.

The image was cut out using the largest Oval Stitched Shape Framelits and then mounted on The scalloped edged oval from the Layering Ovals Framelits.
I adhered the mounted image with dimensionals to raise it a little from the other stamped background.

The interior of the card looks like this:
The card feels almost back to front and I think if I did it again this would impact what and how I was stamping but overall I think its a really simple but effective fold and would recommend it as it's quick and simple.

Thanks for popping by - I hope you enjoyed the project.
Don't leave us just yet. I am sure that you are going to love Tanja's card - she always blows me away!
See you next time1
Shanni xx

Blog Hop Order for December
1.Gina Connor (UK)
2.Satomi Wellard (Japan)
3.Shannean Moncrieff (Australia) that's me!
4.Tanja Kolar (Germany)
5Aude Barbara(France)
6.Miranda Mols (Netherlands)
7.Astrid Hofman (Austria)

Saturday, November 25, 2017

Totally Techniques - Stampin' Blends

Welcome back to another Totally Techniques DT Blog Hop - this month our feature is Stampin'Blends. I don't know about you crafters but there is nothing more relaxing than colouring in. . . you are able to tune out completely and just relax, so this technique was a blessing to me this month as we are so busy with end of school year, break up parties and concerts, graduations and all things festively oriented. . .

I hope you enjoyed Marine's gorgeous creation - her projects are always so beautiful!

Here is my project this month:
I love the Birthday Blooms set because it's so easy to stamp and colour. I have used the following Stampin' Blends:

Dark Pink Pirouette
Light Pink Pirouette
Light rich Razzleberry
Dark Old Olive
Light Old Olive
Light Smokey Slate

It's a square easel card! Base card is Thick Whisper White card stock mounted on a square of Blushing Bride. On top of the Whisper White I have mounted a square of Blushing Bride which is marginally larger than the square of Dazzling Diamonds Glimmer Paper which forms my canvas.
I stamped the flowers from Birthday Blooms on Shimmery White Card Stock in Tuxedo Black Memento ink and coloured the flowers. I like to start with the darker shadowed areas first and then come in with the lighter colour and if need be the colour remover although in this instance I didn't need to. I then fussy cut the flowers as I wanted the card to be a bit celebratory and the added bling of the glitter pops the stamped and coloured images nicely.
I adhered a Delicate White Doily to the glimmer paper and then added the stamped coloured flowers to the top of the doily. I went around the bottom of the adhered images with the Light Smokey Slate Stampin' Blend to give an illusion of shadows.  I drew the Dark Pink Pirouette directly on the glimmer paper using a ruler and the pen. I added a touch of smokey slate to the line as well to marry in with the shadowing beneath the flowers.
I highlighted the stamens of the flowers in Light Rich Razzleberry. I added the Silver Mini Tinsel Trim to marry in with the Rhinestone Jewels and glitter of the glimmer paper.
The easel device of the card is the line of Rhinestone Jewels inside the card. The sentiment is the Stylized Birthday stamp. I stamped in Tuxedo Black Memento Ink on Whisper White card and fussy cut it out. It is adhered with Tombo Multipurpose Glue. I also added Clear Wink of Stella to the voids in the letters in the sentiment in the hope of getting it to blend a little better but I don't think I was successful.
I hope you have taken some inspiration from my card. I love the fact that you can draw on and colour glimmer paper with the Stampin' Blends to work them in with the project.

Don't leave us just yet, we have a few more blogs to go, starting with the amazingly talented Zoe Tant, from the UK! Check out Zoe's beautiful project this month!

See you next time!
Shanni xx

Order of November Blog Hop
Patrice Halliday-Larsen (New Zealand)
Nadine Weiner (Germany)
Marine Wiplier (France)
Shannean Moncrieff (Australia) that's me!
Zoe Tant (United Kingdom)
Barbara Meyer (Austria)
 Annette Elias (Netherlands) and brand new!

Sunday, November 19, 2017

Thinking Outside the Box - Simple Advent Calendars

Welcome back to another Thinking Outside the Box Blog Hop! This month we are sharing Simple or Quick Advent Calendars. Enjoy!
The idea behind the Quick and Simple Advent Calendars is that you make just four of them to represent the 4 Sundays of Christmas. I hope you find some inspiration and fun with our creations. You may have just popped by from Barb's amazing blog, if so stick around we have heaps to share. This is my creation:
My photo is not in black and white - these are the colours I have chosen for my project this month. I have made four non-traditional boxes!
So the boxes are made with 12" x 12" Basic Black cardstock. I have stamped in Archival Black Ink and Smokey Slate (in the instances when I have used grey).

Here are the instructions which I have kept simple:

1.  Each project uses a piece of card stock 6" x 12"
I scored the piece landscape at 4" (10.2 cm) and then turned the card stock to portrait and scored at 27/8" (7.4cm) from the left hand side of the card. I folded the scored line up and simply scored three more times at the same measurement.

You leave the little left over bit on the right hand end to adhere the box together.

2.  I snipped out the triangle shapes so that the base of the card would be easier to fold and adhere.
The photo is flipped as it is the "right side" of the project.

3. Next step was cutting the windows. Ideally it would be great if we had some rectangle framelits so that we could simply run a box template like this through the big shot. Instead I used my Paper Trimmer to cut out 4 voids.

I simply cut in from each scoreline 3/8" (1cm). I left a consistent border at the top of the box of just shy of 5/8" (1.5cm) and at the bottom 3/16" (0.5cm).

4. To decorate the voids I cut Vellum Card to fit the space. In total I cut 16 pieces 21/2" x 31/2" (6.4cm x 9cm). I stamped these before I adhered them on the inside of the box over the void.
5. To keep the advent calendar interesting I stamped off to the side on some panels and added contrasting detail in Basic Black card stock.
6. I adhered the Vellum Card using Tombow Multi Purpose Glue. I used the same glue for the cut outs when adhering them to the front of the boxes.
7. Where necessary I trimmed excess overlaps. This is an image of the reverse side of the box before construction. You can see that i have placed tape on the bottom panels.
This is the right side of the project. Note the placement of tape for construction. I also made tags to add to the boxes and used Shimmer Ribbon in Basic Black to add a bite of luxe to the boxes.

The four boxes are decorated differently. I have chosen non-traditional images and framelits but it would look very effective with traditional religious images and framelits. So here are the details of each of the boxes.

The Snowman Box


Snowman is from Seasonal Chums

Materials & Tools

Christmas Lamppost Thinlit Dies

Seasonal Chums
Christmas Happiness
Ready for Christmas
Hearts Come Home

Basic Black Card Stock
Silver Glimmer Paper

Archival Black Ink
Smokey Slate Ink

Rhinestone Jewels
The christmas tree is from Ready for Christmas
The house and sleigh is from Hearts Come Home
The background tree frond is from Christmas Happiness
All of the tags have been made in the same way the only difference is the contrasting stamp on the front.

So the back is Smokey Slate punched with a 21/2" Circle Punch. Silver Metallic Thread has been toused as the next layer and then on top of that is Silver Glimmer Paper punched with the Everyday Label Punch.

The top circle is 2" Whisper White. The rings from Cheers to the Year has been heat embossed in Silver, the greeting from the same set is stamped in Black Archival Ink and the leaves in Smokey Slate.

The Little Drummer Boy Box


The little drummer boy and the background foliage are from the Musical Season stamp set

Materials & Tools

Musical Instruments Framelits Dies

Musical Season

Silver Foil Paper
Basic Black Card Stock

Basic Black Shimmer Ribbon

Black Archival Ink
The French horn is cut using the Musical Instruments Framelits and Silver Foil card
The little drummer Boy is used twice on this box but positioned ever so slightly differently.
 The treble clef has been cut out from Silver Foil.
 This is how the tag sits over the box.
The tag is exactly like the earlier one above, the only difference being the leaf image from Musical Season stamp set, stamped in Smokey Slate.

The Lantern Box
I love the simplicity of the Lantern Builder Framelit Dies, the candle image is from the matching stamp set, Seasonal Lantern

Materials & Tools

Lantern Builder Framelit Dies
Chandelier Thinlit Dies
Detailed Gate Thinlit Die

Seasonal Lanterns
Season to Sparkle

Black Archival Ink
Smokey Slate Ink

Rhinestone Jewels
The beading add on to the chandelier is from the Season to Sparkle stamp set, stamped in Black Archival ink and decorated with rhinestones.
 I added a rhinestone as the flame on the candle, stamped in smokey slate.
 With the tag across the same panel.
The Detailed Gate is busy enough without the need to add a stamped image. I simply added rhinestones to pop the detail.
The tag is the same as the rest, the leaves are from Seasonal Lantern.

The Snow Box
Very little stamping on this box. The snowflake is from Trim Your Stockings Thinlits and the scroll from Swirly Snowflakes Thinlit Dies.

Materials & Tools

Trim Your Stocking Thinlit Dies
Swirly Snowflakes Thinlit Dies

Stare of Light
Cheers to the Year

Silver Stampin' Emboss Powder
Versamark

Silver Glimmer Paper

Rhinestone Jewels

Black Archival Ink
Smokey SlateInk
 The star dust from Star of Light Stamp set is heat embossed in Silver.
I liked the scroll and the snowflake without any stamping but the rhinestones add a bit of bling!
 Star dust and a snowflake off the edge.
 With the tag in situ.
Tag has the snowflake from Cheers to the Year as the contrast.

So this is what they look like when they are set up with candles in them:
Thanks for stopping by and I hope that you have enjoyed the projects.  I have decided that I will use mine as table decorations on Christmas Eve.

Don't leave us just yet. Check out Tanja's amazing creation!


Stay sparkly!
Shanni xx

Order of November Blog Hop
1. Shannean Moncrieff Australia
2. Tanja Kolar Germany 
3. Yoshiko Endo Japan
4.Zoe Tant United Kingdom 
5. Annette Elias Netherlands
6. Dena Plummer USA 
7. Sharlene Meyer New Zealand
8. Beate Wacker Austria
9. Aude Barbara France
10. Barb Stewart Canada